ShortPixel Website Optimizer Documentation
ShortPixel Website Optimizer offers a straightforward web interface to our API, available to any PHP website (Magento, Joomla, Drupal, custom brew, etc.) and allows optimization of the site's image and PDF folders. While a folder is being optimized, you can watch the optimization progress in the browser.
Installation
Step 1: Download the latest stable release: ShortPixel Website Optimizer v. 1.4.3 - lib.1.9.2 ( release notes ) and unpack it in your website's root folder. You should find there a subfolder named "shortpixel-web", that was extracted from the archive.
Step 2: Check the rights of the newly created folder and files. If you used a web tool like CPanel to upload it and unpack the archive, it should be OK but if you uploaded it as root for Linux or Administrator for Windows, you might need to change the rights in order to allow the Webserver user to write to the shortpixel-web folder.
For *nix OS-es (eg. Linux, Unix, Mac) just run the command sudo chown -R www-data:www-data shortpixel-web which will set the correct owner.
Step 3: Open the ShortPixel Website Optimizer startup page in the browser, using URL: http://[[your.website.domain]]/shortpixel-web/webroot/index.php. If the page loads properly, you're up and running. If the page does not load, it usually means that there are rewrites in the server configuration files that redirect all URLs to a master script. Depending on your webserver, you might need to make specific changes in the webserver configuration.
Optimizing folders
In order to optimize images and PDFs with ShortPixel Website Optimizer, you need to have an API Key. If you don't have one yet, you can request one for free in our Sign-up page. After you have your API Key, follow these simple steps to optimize your images and PDFs:
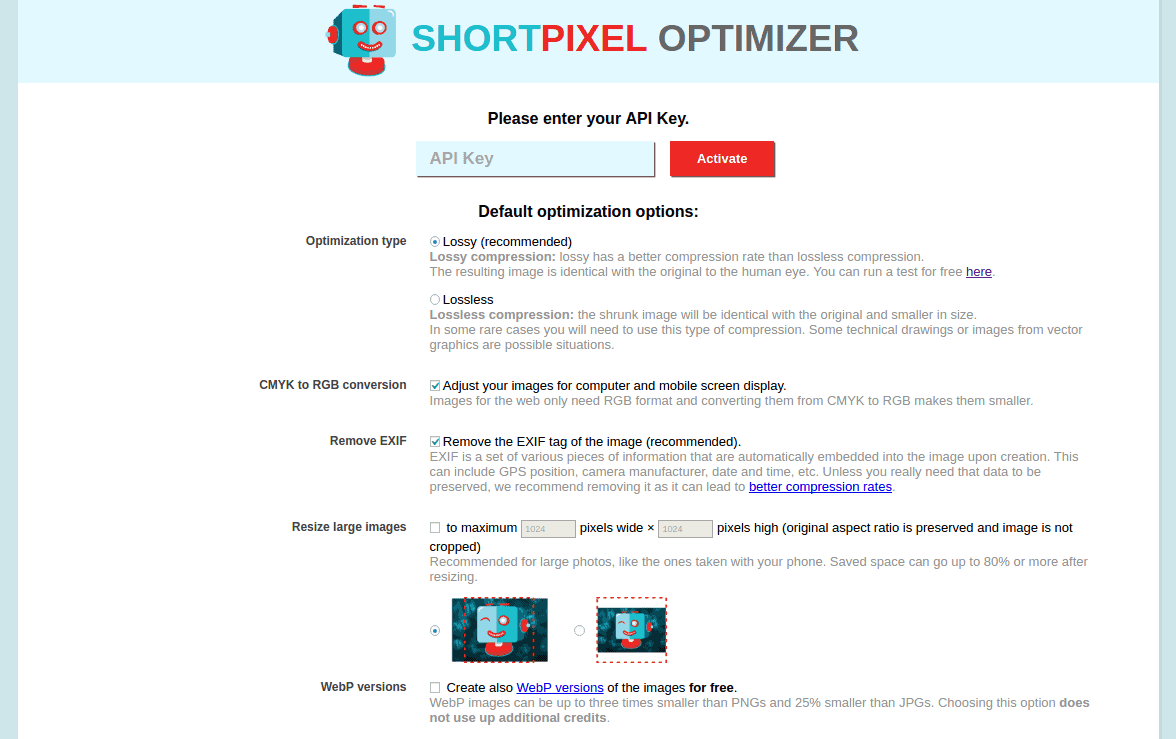
Step 1: Review the default settings and input the API Key to activate ShortPixel Website Optimizer. The API key, along with the default settings, will be saved in the shortpixel.ini file, inside the shortpixel-web folder.
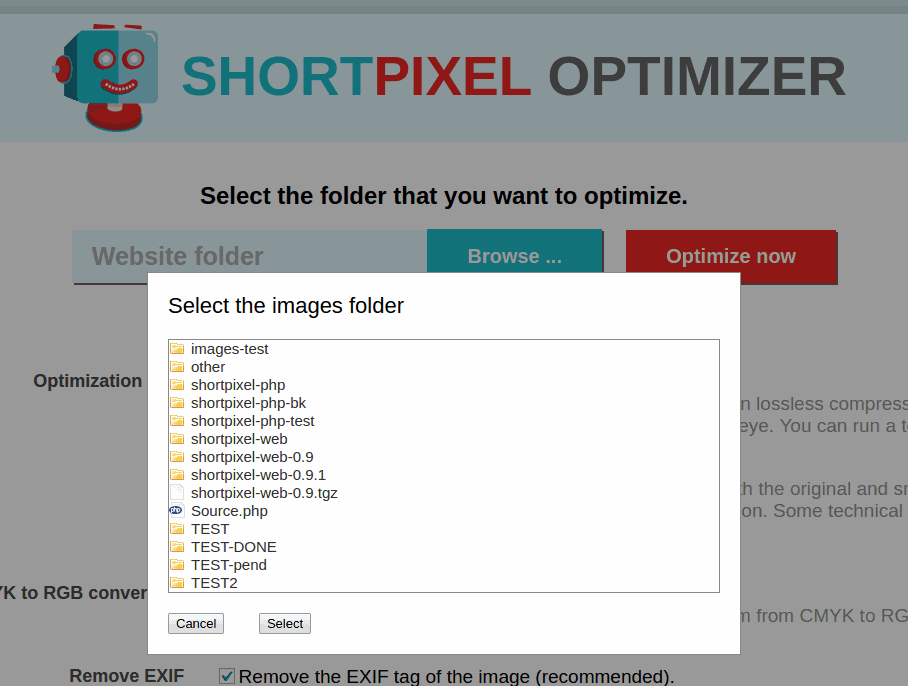
Step 2: Select the folder that you want to optimize and press Optimize Now. If you change the default settings, the changed settings will apply only to the selected folder. You are also prompted for a corresponding URL for the folder - this is the URL by which the folder is accessible from the browser. ShortPixel Website Optimizer tries to figure it out by itself, but you can change it, if it's not correct. Using a corresponding URL will significantly speed up the optimization as the images are sent as URLs and our optimization servers can download them asynchronously instead of waiting for one big POST attachment to be uploaded. You can also press ignore if the images in the folder are not accessible via Internet.

Step 3: Sit back and relax while ShortPixel Website Optimizer optimizes the files for you. Please remember to keep the browser open in order for the optimization to proceed. If for any reason you close the window or the Internet connection is temporarily down, just select the folder again after reloading the page, and the optimization will continue from the point it left.
Security considerations
If your site is a public website, then the ShortPixel Website Optimizer's folder, that you just created inside your root, might be public as well and available to any visitor knowing the URL. A malicious visitor could then for example use it to browse your website's folder structure, find out what modules you are using and look for their vulnerabilities.
Obviously they have to wild-guess that you're using ShortPixel's Website Optimizer in the first place, but let's assume that they heard you boasting about how fast your website is loading now, after you had your images optimized. :-)
If you want to protect yourself from this risk, the easiest solution to prevent unauthorized access is to change the path of ShortPixel Website Optimizer to a folder name that only you know. For example, if you rename shortpixel-web to my-Sh0r+P1x3l-s3cr3t-F0LD3R, this basically has the security of a password, as the access URL to ShortPixel Website Optimizer will change to http://[[your.website.domain]]/my-Sh0r+P1x3l-s3cr3t-F0LD3R/webroot/index.php and a visitor would need to guess your custom folder name.
You can also set up a HTTP AUTH user and pass on ShortPixel Website Optimizer's folder which will allow defining several users and individually managing access. Depending on your server's OS and webserver (Apache, NginX, etc.) this setup can vary so, if you've never done this before, either check with your website admin or look it up. For example, a short guide for Apache on Ubuntu can be found here: How To Set Up Password Authentication with Apache on Ubuntu 14.04.
Web 2 CLI bridge
You can benefit both from the ease of use of the web interface and from the unassisted execution of the CLI tool by using the Web 2 CLI bridge. You just need to launch the optimization using a URL like this:
https://[YOUR.SITE]/shortpixel-web/webroot/web2cmd.php?apiKey=[YOUR-API-KEY]&folder=[FULL/PATH/OF/THE/IMAGE/FOLDER]
Any parameter that you would normally pass to the ShortPixel CLI will work as a GET parameter in the URL. The web user needs to have rights to execute an at job. More info.
More tweaks
Some settings can be directly input in the shortpixel.ini file created in the shortpixel-web folder. If your site uses HTTP AUTH, you can add:
      user="myHttpAuthUser"

      pass="thePass"
Under the hood
ShortPixel Website Optimizer sends each image to our optimization servers and retrieves the optimized version, replacing the original. You need an internet connection in order to be able to optimize images with our service.
ShortPixel Website Optimizer creates for each folder that is selected for optimization a .sp-options file containing the selected options for that folder. Also, in each folder and subfolder, a .shortpixel file is created, containing the optimization status for each file and subfolder in that particular folder, alongside with information such as the file size, percent improvement and optimization date.
Latest releases
Mar 5th, 2024 - Version 1.4.3 (using Client Library version 1.9.2)
- Updated to the latest Client Library 1.9.2 having the following fixes: Replace the deprecated utf8_encode if the replacement is available. Php 5.6 compat.
Nov 17th, 2022 - Version 1.4.3 (using Client Library version 1.9.1)
- Compatibility with PHP 8.1 on Windows.
May 18th, 2022 - Version 1.4.2 (using Client Library version 1.8.9)
- Compatibility with PHP 8.1, update Client Library.
Dec 10th, 2020 - Version 1.4.0 (using Client Library version 1.7.0)
- Add the option to generate AVIF versions.
Mar 27th, 2020 - Version 1.3.3 (using Client Library version 1.6.3)
- [LIB] fix CURLOPT_FOLLOWLOCATION curl parameter.
- [LIB] clearstatcache() before reading the filesize
- [LIB] Fix wrong global status
- [LIB] fix error when resizing to more than 1000px
- [LIB] make sure we don't overwrite the original in backups in any case
May 21st, 2019 - Version 1.3.3 (using Client Library version 1.5.5)
- Stylesheet changes.
- Handle non-UTF8 filenames.
- [LIB] add fromBuffer method. Add --createWebP to CLI.
- [LIB] Fix PHP 5.3 incompatibility.
December 6th, 2018 - Version 1.3.2 (using Client Library version 1.5.3)
- Fix sending a request with the file count of the folder, instead of folder name, in some circumstances.
- Handle non-UTF8 filenames.
- [LIB] Handle non-UTF8 filenames.
- [LIB] Folder scans cache.
- [LIB] Fix compatibility with PHP < 5.5 - replacement for json_last_error_msg() and stop defining booleans in 0bxxxx format
September 23rd, 2018 - Version 1.3.1 (using Client Library version 1.5.2)
- Fix the backup folder with prepended / when choosing the same as the source folder.
- [LIB] Add a static function for getting the list of files ignored when listing a directory.
- [LIB] Fix broken symlink for the examples file.
August 9th, 2018 - Version 1.3.0 (using Client Library version 1.5.0)
- Web 2 CLI bridge
- [LIB] Smart lock with variable timeout.
- [LIB] Cache the folder scans for a given time if the parameter cacheTime is set, in order to improve speed.
July 21st, 2018 - Version 1.2.1 (using Client Library version 1.4.1)
- [LIB] Fix CLI retrying when folder is optimized but there are some pending files which are actually corrupted files.
May 28th, 2018 - Version 1.2.1 (using Client Library version 1.3.3)
- [WEB] Fix JavaScript error for cases when the Ajax returned some images which could not be processed.
- [LIB] Fix retrying when the source is not the same as the destination folder.
April 23rd, 2018 - Version 1.2.0 (using Client Library version 1.3.0)
- Integrate the Website Optimizer with the CLI so a job running on cron using CLI can be monitored from the Website Optimizer page.
- Total optimization percent displayed in the optimization success page.
December 23rd, 2017 - Version 1.1.0 (using Client Library version 1.1.5)
- Image compare popup.
- Windows compatibility.
