Requirements #
‘Vary’ header #
If you have enabled WebP and/or AVIF in the plugin settings, there may be issues serving the correct format for browsers. This is because your CDN must support the Vary header (which, for example, is not available on Cloudflare’s free plan) and be configured to deliver the original format, the WebP version, and/or the AVIF version from the same URL, depending on the browser’s capabilities. This ensures the CDN knows (and caches and delivers accordingly) that there are two or three different files for the same URL, based on the Accept header sent by the browser.
Therefore, if you are not able to set up the Vary header, you have two options:
- Either disable both formats, WebP and/or AVIF,
- or simply use ShortPixel’s default CDN, which is among the fastest in the market.
SSL certificate #
Please note that if you’re not using Cloudflare as CDN, then you must make sure that your CDN is able to handle the SSL certificate for the custom subdomain you’ll use, so you can have the API URL withhttps. If they cannot handle this, a certificate error will occur. Please contact your CDN provider if you need help with this.Steps #
If you want to use your own CDN when using ShortPixel Adaptive Images (SPAI) or ShortPixel Image Optimizer (SPIO), instead of ShortPixel’s CDN, follow these steps:
- Think of a suitable subdomain name for the delivery of your images, such as
cdn,img,images,media, and so on. For example, if your website isexample.comand you chooseimgsubdomain, your images will be served fromimg.example.com. - Edit your DNS records to add a CNAME from
cdn.example.comtono-cdn.shortpixel.ai. This step might be slightly different depending on what CDN you use. Remember thatexample.comshould be changed to your actual domain, and thatcdnshould be changed to something else if it’s already used by another CNAME, likeimages.example.com ormedia.example.com - Enable the CDN for your subdomain. After adding the CNAME record, you need to activate the CDN service for your custom subdomain. Many CDN providers require this step to properly handle requests and issue SSL certificates.
- If you’re using Cloudflare, make sure that the orange cloud is enabled for the CNAME record in your DNS settings.
- If your CDN provider allows setting an origin, use
no-cdn.shortpixel.aias the origin for the custom subdomain (e.g.,cdn.example.com).
- Make sure the new record (
cdn.example.com) works as expected with an online tool like whatsmydns.net. - Change the CDN domain / API URL on the WordPress settings.
- If you are using SPAI, navigate to your WordPress dashboard and go to Settings > ShortPixel AI > Behavior > API URL. There, change the default URL to
https://img.example.com/spaiwhereimg.example.comis the subdomain that you’ve set up above.
- If you are using SPIO, navigate to your WordPress dashboard and go to Settings > ShortPixel > WebP/AVIF & CDN and enable the “Deliver the next generation images using the ShortPixel CDN” option. There, change the default URL to
https://img.example.com/spiowhereimg.example.comis the subdomain that you’ve set up above.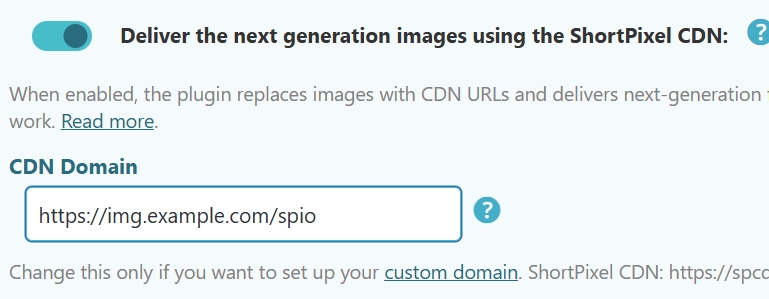
- If you are using SPAI, navigate to your WordPress dashboard and go to Settings > ShortPixel AI > Behavior > API URL. There, change the default URL to
Examples #
Here you will find instructions on how to do the previous steps for the most important CDN providers.
- How to use bunny.net with ShortPixel Adaptive Images
- How to use Cloudflare with ShortPixel Adaptive Images
- How to use StackPath with ShortPixel Adaptive Images
- How to use Amazon CloudFront with ShortPixel Adaptive Images
- How to use Fastly with ShortPixel Adaptive Images
- How to use KeyCDN with ShortPixel Adaptive Images