ShortPixel Adaptive Images offers a straightforward tool to check the status of the optimized images on a page of your site. Just log in to your WordPress admin panel and then visit any page. On the Toolbar you will notice a ShortPixel icon:
 Note: the Image Checker icon will only show up if the option Logged-in users is enabled.
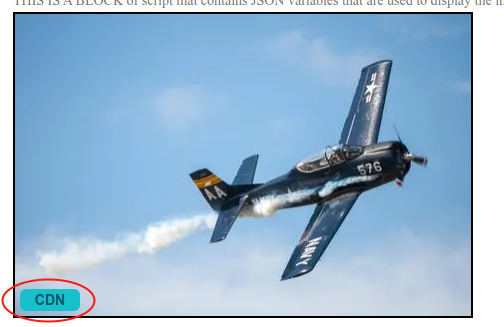
Click on that icon and you will turn on the Image Checker. A tag will appear for each image: “CDN” or “ORIGIN“. “CDN” means that the image is served optimized from our CDN, and “ORIGIN” that it’s served from your server or, in other words, that ShortPixel Adaptive Images is not processing it.
 Also, the cursor will change to a cross (⌖) and when you click on an image, you will get additional information and actions:
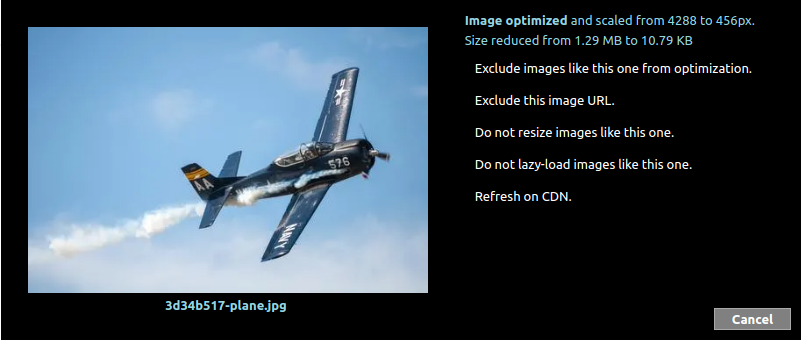 The popup displays information about scaling and file size, and it offers the following actions as well:
- Exclude images like this one from optimization – Allows you to exclude from optimization the images that are displayed in the same way/place in all the pages, based on a CSS selector. The images won’t be served from ShortPixel’s CDN either. More details can be found below.
- Exclude this image URL – Will exclude only this specific image from optimization, based on its URL. The image won’t be served from ShortPixel’s CDN either.
- Do not resize images like this one – Same as action #1, but it will only prevent these images from being resized. The optimization and serving from ShortPixel’s CDN will still happen.
- Do not lazy-load images like this one – Same as action #1, but it will only prevent these images from being lazy-loaded, resized and converted to WebP/AVIF. The optimization and serving from ShortPixel’s CDN will still happen.
- Refresh on CDN – This will send a request to refresh the image on our CDN. This is useful if you edited the image and replaced it keeping the same file name (for example using the Enable Media Replace plugin) so the URL did not change.
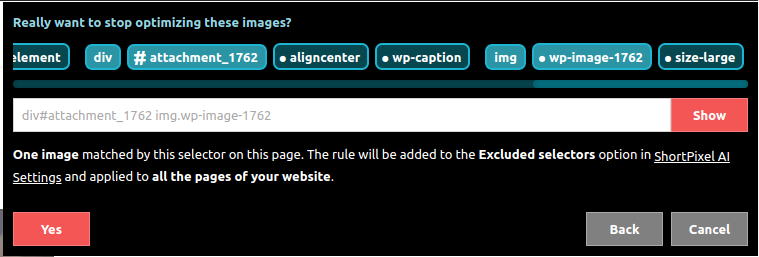 You can click on the blue tags on top to toggle them or you can write your own selector. Just take into account that if you click again on the tags, your manual changes in the input box below will be overwritten. You can at any time click on the “Show” button to see which images from your page are affected by the selector.
as simple as possible, ideally like
img.classname only. The more complex they are, the more it will affect the performance of your site. When you’re done, click on “Yes” and the selector will be saved to the list of excluded selectors on the settings page. You can see it by going to the “Exclusions” tab on Settings > ShortPixel AI, on your WordPress admin panel.
How to clear WordPress cache
