WordPress has lots of plugins. And when we say lots, we mean lots. At the moment of writing this article, it shows 54940 plugins. These plugins have very different purposes, and you can tell immediately if they work or not, right after installing and activating them. But, what happens with those that work on the background? For example, Autoptimize? How can you know if they are doing their job correctly? Let’s see it.
Testing Autoptimize #
First, as a note, in this article we will just talk about the Image Optimization part of Autoptimize, which is the part we are involved in.

The first and most important part of this section in Settings > Autoptimize > Images is the checkbox Optimize Images. The fastest way to know if your images are being optimized is by looking at the source code of the page and see where the image is coming from. So, assuming that you already marked the checkbox and saved the changes, do the following:
- Reload the page (F5) twice. Unless a page is visited, the images on a specific page won’t be optimized. So, reload once to “send” the images to optimize and another time to see the results.
- Right-click on the image you want to have optimized.
- Click Inspect or Inspect Element (it depends on the browser).

- The source code will open next or below the page, and the relevant line of code will be highlighted. Look at the URL of the image; it is usually located in the
srcattribute:
- Does the URL start, like on the previous image, with
https://sp-ao.shortpixel.ai? Congrats! Your image is optimized correctly.
If you go back and uncheck the checkbox, and repeat all the process, now the same images will be coming from your own domain:

I have the checkbox active, but the images are not optimized. Why? #
Have a look please at the following article: Why aren’t all the images on a page optimized by Autoptimize? – ShortPixel Knowledge Base
Are the WebP and/or AVIF served correctly too? #
This we can also test it using the Developer Tools of the browser. First, press F12.
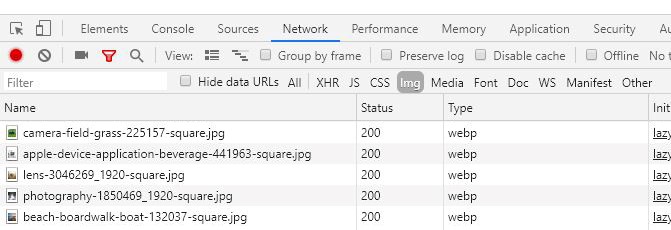
- Click on the Network tab, and then Img:

- Reload the page (F5) twice, waiting a few seconds in between. Unless a page is visited, the images on a specific page won’t be optimized. So, reload once to “send” the images to optimize and another time to see the results.
- Now you should see all the images with Type
webporavif, regardless of the extension of the file. There’s a chance you will also see some other unusual stuff, likesvg+xmlortext/html. You can ignore those.
ShortPixel Adaptive Images (SPAI) #
Lastly, we suggest giving SPAI a try, as it also serves the right size of the image for the specific device that is looking at the page, saving you more load time. For more information about this, check out this article.
We hope that helps you with your testing!