Using ShortPixel Image Optimizer (SPIO), you can create AVIF images alongside existing images when optimizing them.
You could say that the most popular image file formats for the web are currently JPG and PNG. A few years ago, Google introduced WebP, a format that delivers images 30% smaller than JPG while maintaining the same quality. AVIF takes this further, promising images that are 50% smaller than JPG with the same quality.
Read more about why AVIF is beneficial for your website here: What is AVIF and why is it good? – ShortPixel Blog
How to create AVIF images? #
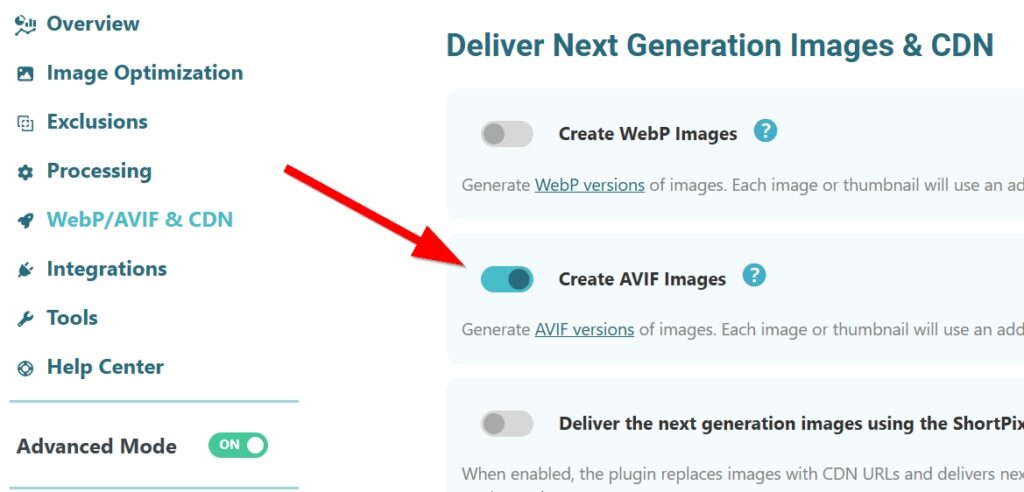
Just enable the “Create AVIF Images” option in the “WebP/AVIF & CDN” section of the ShortPixel settings in your WordPress dashboard.
What to do if I want to create AVIF but I already optimized my images? #
First of all, make sure you update SPIO to the latest version. This is very important because versions newer than 4.X allow you to create AVIF files for images that have already been optimized. With older versions, you’ll have to restore your images and optimize them again, spending credits unnecessarily.
Once SPIO is updated to the latest version, follow these three steps:
- Go to Media > Bulk ShortPixel and click on “Start Optimization”.
- On step 1, under “Optimize”, make sure the toggle for “Media Library” is turned on. Then, under “Options”, select the option to create AVIF files.
- Follow the further instructions.
For more information, please read this article.
How to deliver the AVIF images on the front-end? #
Creating AVIF images is only the first step! You also need to make them available to all your users. Fortunately, SPIO provides two different methods for doing this.
Option 1 – Using the ShortPixel CDN #
The easiest way to deliver your AVIF files is by using the ShortPixel CDN. First, on your WordPress dashboard, go to Settings > ShortPixel > WebP/AVIF & CDN, and enable the “Deliver the next generation images using the ShortPixel CDN” option.
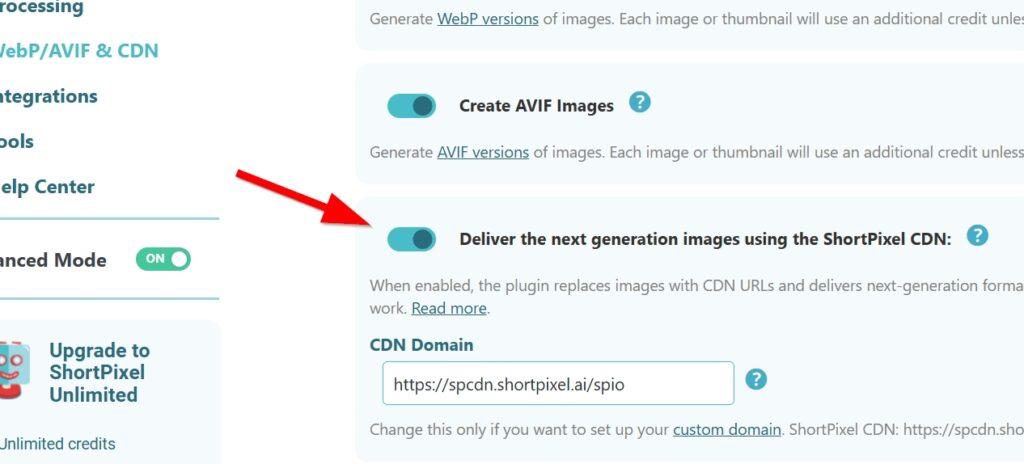
When enabled, the plugin will replace every image URL on your site with CDN URLs that will automatically deliver the AVIF format if the browser supports it. For example, if your image URL is https://example.com/wp-content/uploads/2025/02/image.jpg, the new URL will look similar to this: https://spcdn.shortpixel.ai/spio/ret_img,q_orig,to_avif,s_avif/example.com/wp-content/uploads/2025/02/image.jpg
To learn more about this delivery method, click here.
Option 2 – Without using a CDN #
If you don’t want to use the ShortPixel CDN to deliver the AVIF files, you can simply deliver the locally generated files from your server. To do this, enable the “Serve WebP/AVIF images from locally hosted filed (without using a CDN)”.
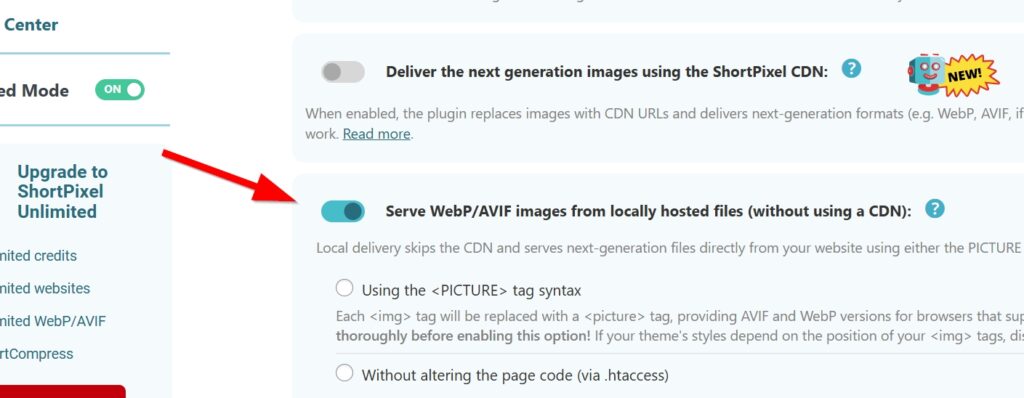
Then choose one of the following methods:
- Using the <PICTURE> tag syntax: This method alters the page code and changes each
<img>tag with a<picture>tag. - Without altering the page code (via .htaccess): With this method, a new block of code is inserted into the .htaccess file. This is the recommended option.
Troubleshooting the AVIF delivery #
Server not configured properly #
If you get this message on the WordPress admin dashboard…
Avif server test failed. Your server might not be configured to display AVIF files properly. Serving Avif might cause your images to not load. Check your images, disable the AVIF option or update your web server configuration.
… please check this article: I get the message “Avif server test failed”. How do I configure my web server to deliver AVIF images?
How to check if your AVIF images are served correctly #
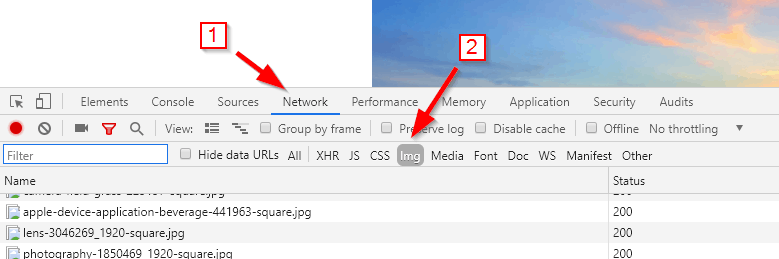
You can use the browser’s developer tools to test if your images are served as AVIF. First, go to your website and then press F12. A window similar to the one below should appear. Next, click the Network tab and then click the Img filter.
Press F5 on Windows or CTRL + R on Mac to reload the page, then scroll down to load all images:
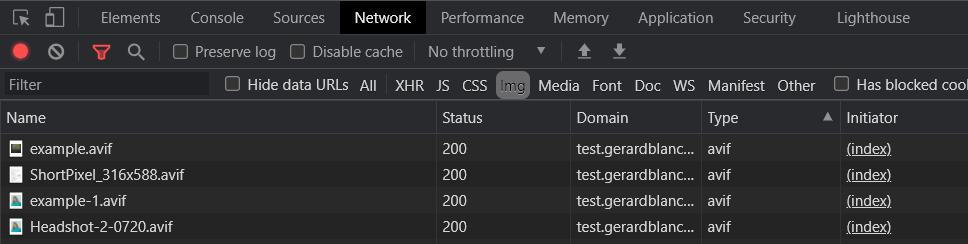
You should see all images with the Type avif, regardless of the extension of the file. There is a possibility that in this case you will also see some other irrelevant things, like svg+xml or text/html. You can ignore those.
If you can see the Type avif, congratulations! You are now successfully serving AVIF images to compatible web browsers.
Only some of the images are served as AVIF #
If, after checking whether your images are served as AVIF, you find that only some (not all) are in AVIF format, there are two possible reasons for this:
- Our algorithms may have determined that the AVIF version of an image is more than 5% larger than the original. In such cases, our plugin does not store the AVIF file on your server to minimize credit consumption and, as a result, does not serve it to your website visitors. To learn more about this behavior, please check this article: Why is my image not converted to WebP or AVIF?
- If you are using the ShortPixel CDN to deliver images (with the “Deliver the next generation images using the ShortPixel CDN” option enabled), the process works as follows: The first time an image is accessed, it is registered for storage in the ShortPixel CDN. However, to avoid making users wait a few seconds, the original image is immediately served via an HTTP 307 redirect. After a short delay—typically a few seconds, or a few minutes in rare cases—the image should be fully available on the CDN and will be displayed upon page refresh. Keep in mind that the time it takes for the AVIF version to appear may also depend on your browser’s cache. In short, if you are using the ShortPixel CDN, we kindly ask you to wait a few minutes.
None of the images are served as AVIF #
If the delivery method that you have chosen doesn’t seem to be working at all, and no image is served as AVIF, take a look at these articles first:
- If you selected “Using the <PICTURE> tag syntax”, check this: The “Using the <PICTURE> tag syntax” option doesn’t work; next-gen images won’t show up.
- If you selected “Without altering the page code (via .htaccess)”, check this: Caveats of delivering WebP or AVIF images via .htaccess
- If you selected “Deliver the next generation images using the ShortPixel CDN”, check this: Deliver images using the ShortPixel CDN in SPIO
If you still cannot solve the problem, or if our delivery methods do not meet your needs, you should try an alternative solution for serving AVIF images, such as…
- replacing ShortPixel Image Optimizer with ShortPixel Adaptive Images (SPAI). If you want to learn more about SPAI, read this article.
- configuring your NGINX server (if relevant) to transparently serve AVIF files: Configure NGINX to transparently serve AVIF files when supported.
- using another plugin to deliver the AVIF files generated by ShortPixel. If you choose this option, remember to uncheck both the “Deliver the next generation images using the ShortPixel CDN” and “Serve WebP/AVIF images from locally hosted files (without using a CDN)” options in your ShortPixel settings.